1. The Importance of Deep Cleaning Your Washing Machine for Health and Appliance Longevity
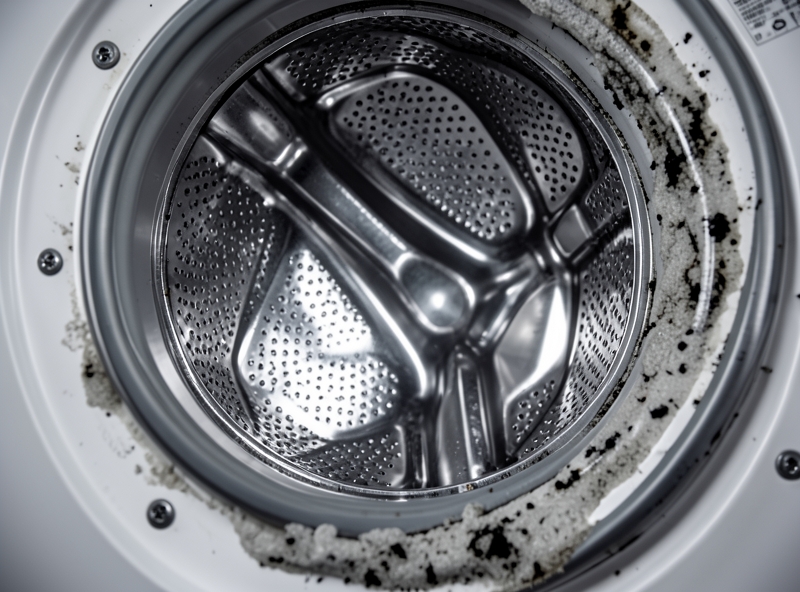
There is a paradox that I believe many of us have fallen into: We assume that the washing machine, the tool that cleans our clothes every day, must be the cleanest item in the house. But the reality is much harsher. Imagine, after every load of laundry, lint, dirt from clothes, and detergent residue do not wash away 100%. They silently cling to "hidden corners" like the rubber gasket, drum crevices, or the drain hose, creating a slimy and damp film.
"A dirty washing machine means you are 'dipping' your family's clothes into a pool of bacteria every day without even knowing it."
This layer of grime is a "paradise" for mold and bacteria to thrive. When we don't perform periodic deep cleaning, every time the machine spins, these harmful agents are stirred up and latch back onto every fiber of fabric. This is the silent culprit behind itching, skin allergies, or more seriously, respiratory issues, especially for young children – those little angels with delicate skin and developing immune systems.
Beyond the health concerns, neglecting washing machine hygiene is a silent "assassin" of your wallet. When residue builds up too thickly, the engine must strain harder to spin the drum. Imagine having to jog with a backpack full of rocks on your back – your washing machine feels exactly the same way. The consequences? The machine gets louder, vibrates more violently, consumes more electricity, and eventually leads to expensive repair bills or, worse, having to replace the machine entirely as its lifespan is significantly shortened.
Here are the "emergency" signs that your washing machine needs an immediate deep clean:
- ✓ Clothes still have a foul, musty smell after washing despite using plenty of fabric softener.
- ✓ Black or gray flakes resembling paper scraps appear on your clothes.
- ✓ Family members experience skin irritation or rashes after wearing freshly washed clothes.
- ✓ The wash cycle takes longer than usual due to a clogged drainage system.
Caring for your washing machine isn't just about keeping the appliance durable; it's actually how we protect the safety of ourselves and our loved ones. Don't wait until the machine breaks down or skin issues arise to start paying attention. Consider deep cleaning a necessary "detox feast" for this devoted companion in your home.
2. Guide to Disassembling Parts That Are "Hotbeds" for Bacteria Accumulation
Don't fall for the misconception that the washing machine is always clean just because it comes into contact with soap daily. On the contrary, the hidden corners inside the machine are a "paradise" for mold, residue, and billions of odor-causing bacteria. To protect your family's health and extend the lifespan of your appliance, you need a spirit of iron discipline and a thorough cleaning process. Follow these steps to dismantle bacterial "hotbeds" immediately.
"Cleanliness does not happen by chance; it comes from discipline and a rigorous daily maintenance routine."
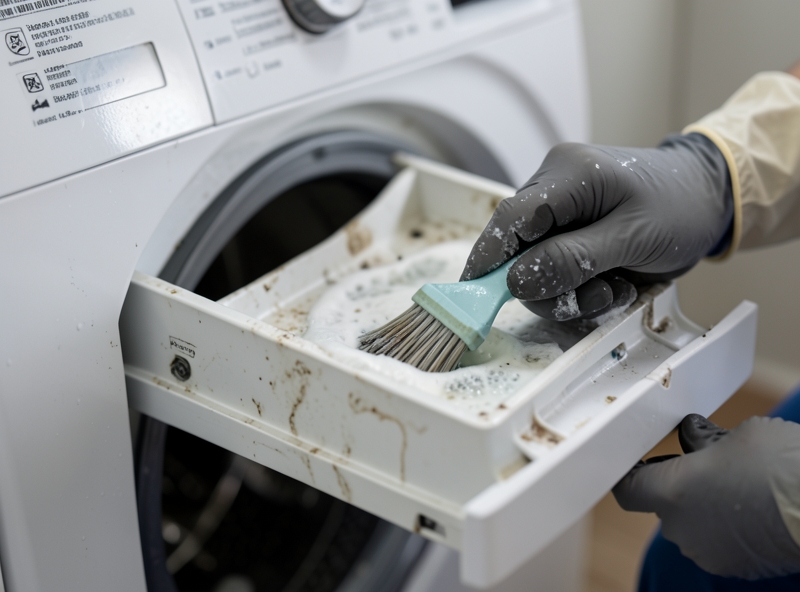
1. Detergent and Softener Dispenser Tray
This is where undissolved soap residue frequently accumulates, forming a slimy film - an ideal environment for black mold to thrive. This slime will cling back onto clothes in subsequent wash cycles.
- How to remove: Press the locking latch (usually marked with PUSH or a different color) in the middle of the tray and pull it firmly outward.
- How to clean: Use a small brush to scrub every corner with warm water. Don't forget to clean the dispenser housing inside the machine as well.
Action plan:
- Remove and wash the tray every 2 weeks.
- Always leave the tray slightly open after washing to allow air circulation and prevent mold growth.
2. Washing Machine Door Rubber Gasket
This part is the worst "black spot" of front-loading washing machines. Water trapped in the folds of the rubber gasket will produce jet-black mold in just a few days if not wiped dry.
- How to clean: Use a cloth soaked in white vinegar solution or a specialized cleaner to wipe clean all crevices inside the gasket. If the mold is severe, soak paper towels in the solution, pack them into the gasket crevices, and leave them overnight before wiping clean.
Action plan:
- Use a dry cloth to wipe the inside of the rubber gasket IMMEDIATELY after taking clothes out of the machine.
- Leave the washing machine door open after use until the drum is completely dry.
3. Lint Filter (Drain Pump Filter)
Located at the bottom front corner of the washing machine, this is where all debris, coins, lint, and stagnant dirty water are "caught." If not cleaned, wastewater will not drain completely, causing a pungent, foul odor.
- How to remove: Open the cover, place a water collection tray underneath. Turn the filter counter-clockwise to remove it.
- How to clean: Remove all coarse debris clinging to the filter, rinse under a strong stream of water. Check inside the pump housing for any obstructions.
Action plan:
- Check and clean the lint filter regularly once a month.
- Drain all residual water through the auxiliary drain tube before removing the filter to avoid spilling water on the floor.
4. Water Inlet Valve Filter Mesh
Water sources sometimes contain a lot of sediment, sand, or minerals that clog the filter mesh at the inlet valve, causing the washing machine to operate inefficiently, waste electricity, and break down easily.
- How to remove: Turn off the water supply, unscrew the water inlet hose from the machine. Use small pliers to gently pull out the plastic filter mesh piece inside the inlet valve.
- How to clean: Use an old toothbrush to scrub away scale on the filter mesh. Absolutely do not puncture the mesh.
Action plan:
- Check the filter mesh every 3-6 months or when you notice the machine is filling with water too slowly.
- Reinstall it correctly into the joint to avoid water leaks when the machine is running.
| Component | Cleaning Frequency | Signs Needing Immediate Action |
|---|---|---|
| Detergent Tray | Weekly | Slimy film, black spots appearing |
| Rubber Gasket | After every wash | Sour smell, black stains that don't wipe off by hand |
| Lint Filter | Monthly | Machine cannot drain water or drains very slowly |
| Water Inlet Valve | Quarterly | Water intake time is longer than usual |
Discipline in cleaning these parts is not just about protecting an expensive appliance, but about protecting the final hygiene barrier for the skin of you and your loved ones. Don't delay, start your journey to "rescue" your washing machine today!
3. Washing Machine Drum Disinfection Technique: Combining Physical Impact and Benign Chemical Reactions
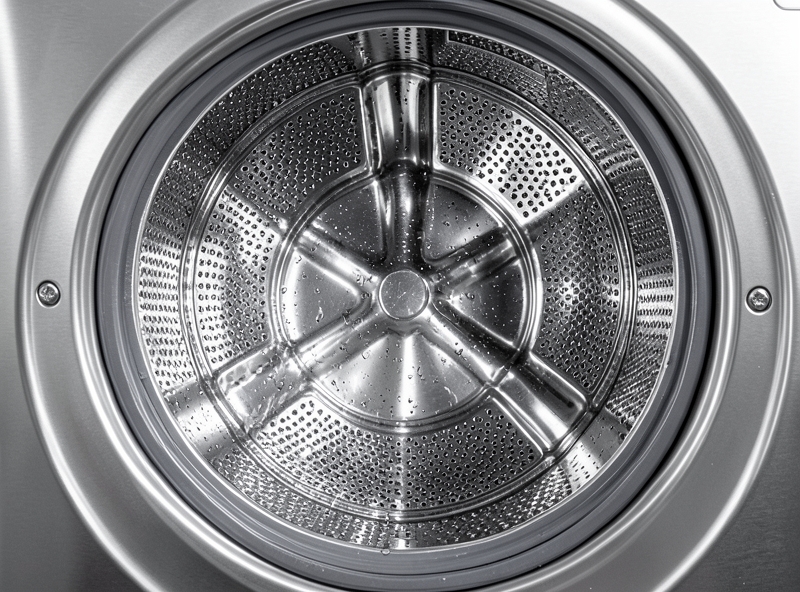
View your washing machine drum not just as a simple piece of stainless steel, but as a complex "ecosystem" where biofilms, calcium deposits, and mold reside in places hidden from view. To completely eliminate these agents, we need a protocol that combines mechanical dynamics with selective chemical reactions.
"Cleaning the surface is only the tip of the iceberg; true effectiveness lies in breaking down the molecular structure of buildup through the resonance between physical friction and chemical pH."
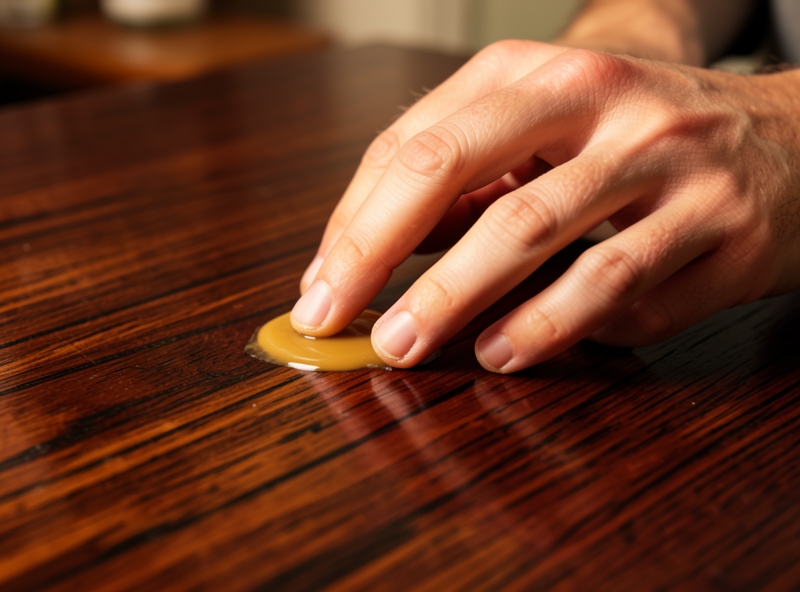
The first stage of this process is "Layered Chemical Impact." Instead of using high-concentration industrial cleaners that damage rubber gaskets, we utilize the power of Baking Soda (Sodium Bicarbonate) and Acetic Acid (White Vinegar) or Citric Acid. When Baking Soda comes into contact with acid, an intense effervescence occurs, releasing CO2 gas. These tiny bubbles act like "nano-drills," penetrating the porous structure of limescale and softening the most stubborn organic bonds.
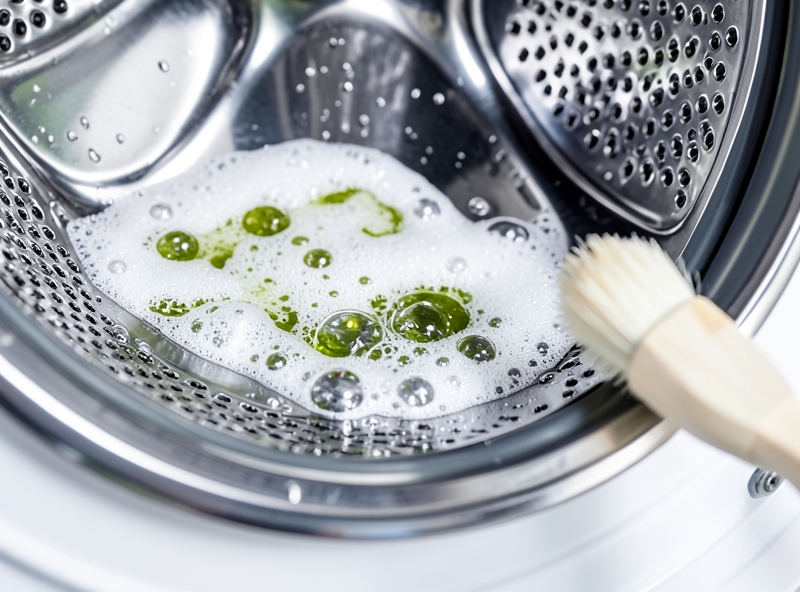
However, chemistry alone is not enough. Stubborn biofilms tend to adhere extremely tenaciously. This is when we need "Mechanical Intervention" from a soft brush. Why a soft brush? Because we need to optimize the contact area without scratching the protective chrome plating. The brush bristles create direct friction, breaking away what remains after the chemical reaction has weakened the adhesive structure.
| Component | Technical Role | Mechanism of Action |
|---|---|---|
| Baking Soda | Mild Abrasive & Deodorizer | Neutralizes odor-causing acids and breaks down fat structures. |
| Citric Acid / Vinegar | Descaling agent | Dissolves calcium carbonate (limescale) and provides broad-spectrum disinfection. |
| Soft Brush | Mechanical Energy | Disrupts the biofilm membrane and pushes dirt out of the drainage holes. |
The optimized execution process for the household "Geek" is implemented through the following steps:
- Pre-coating: Sprinkle 200g of Baking Soda directly into the washing machine drum. Set a gentle spin mode so the powder adheres evenly to the surface.
- Activation: Spray a dissolved Citric Acid mixture or white vinegar onto stained areas. Observe the effervescence – that is when the chemical bonds are being broken.
- Targeted Scrubbing: Use a soft brush to focus on drum grooves, rubber gaskets, and water jet holes. These are the "black spots" where mold accumulates the most.
- Thermal Flush: Run an empty wash cycle with hot water at 60-90 degrees Celsius. The high temperature acts as a final catalyst, completely flushing away all chemical residues and destroyed bacteria.
This method not only ensures maximum durability for the washing machine hardware but is also an Eco-friendly solution, completely eliminating the possibility of bacterial cross-contamination to clothing in subsequent wash cycles.
4. Protecting the Motor and Electrical System During Deep Cleaning
When we begin to "dissect" a household appliance for cleaning, remember that you are touching the machine's most sensitive components. The Motor and the Printed Circuit Board (PCB) are the "heart" and the "brain." A stray drop of water into the copper coils or a transistor pin can cause a catastrophic short circuit the moment you press the Power button. To protect these "mechanical wonders," we need a technically standard Isolation process.
The first tactic is to use plastic wrap or specialized nylon bags to seal off the motor assemblies and transformer boxes. Don't just wrap them loosely; use technical masking tape to secure the edges to completely prevent capillary action – where water seeps through the smallest crevices. In particular, pay attention to the cooling vents on the motor housing; these are the "Achilles' heels" where water can easily penetrate the internal rotor and stator.
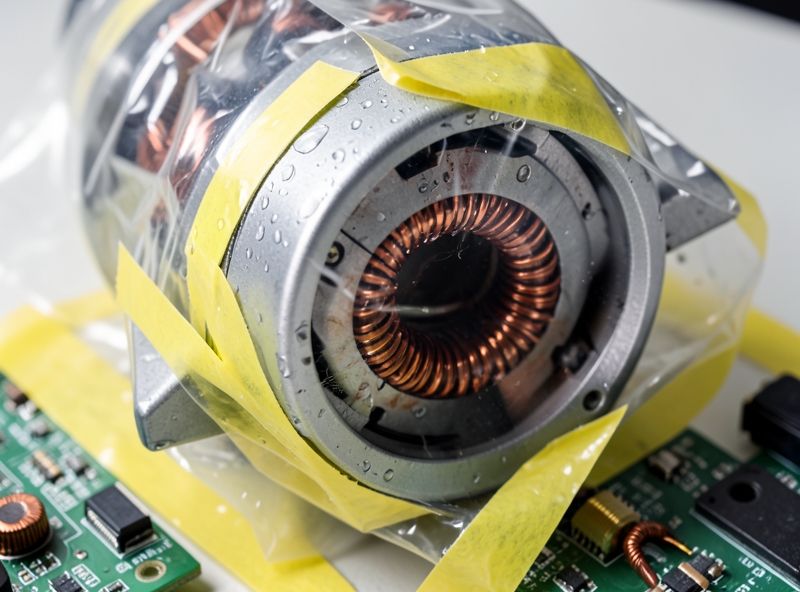
For electronic systems, moisture is the enemy of capacitors and microprocessors. If your device does not possess a high IPX water resistance rating (such as IPX7 or IPX8), direct exposure to high-pressure water jets is strictly forbidden. Please refer to the table below to determine the necessary level of protection for each part:
| Component | Technical Risk | Optimal Protection Method |
|---|---|---|
| Circuit Board (PCB) | Oxidation of component pins, control circuit shorts. | Seal tightly with anti-static bags, use 99% Isopropyl alcohol for cleaning instead of water. |
| Motor Windings | Destruction of the Enamel insulation layer, winding burnout. | Shield with mechanical shrink wrap, never spray water directly into the core. |
| Connectors | Increased contact resistance, causing voltage drops or interference. | Use electrical tape to seal connectors before cleaning the outer shell. |
"Cleanliness is not just about removing surface dust; technical cleanliness is maintaining the Insulation Resistance at an ideal level and leaving no residual moisture in the nooks and crannies of the components."
The final but "vital" step: The Hard Drying process. After cleaning, water molecules may still "hide" under the pins of Surface Mount Devices (SMD) or inside the motor's ball bearings. Use a dryer on the cool setting or an air compressor to blow water out of all corners. A true "Geek" will never rush; let the device rest for at least 12 to 24 hours in a dry, ventilated environment before reconnecting the power. This ensures that moisture in the machine has completely evaporated, returning the dielectric indices to an absolutely safe state before operation.
5. Summary
Think of the washing machine in your home as a "giant filter" for your family's health. If we only focus on making it work while forgetting to care for it, that filter will gradually become a place where dirt accumulates, much like sweeping the floor but hiding the trash under the rug. To maintain a truly safe laundry environment, an intensive cleaning process must be carried out meticulously and scientifically.
The core process we have gone through can be compared to a "recovery spa" session for the machine, consisting of three main pillars: Physical cleaning (removing lint and foreign objects from the filter), Chemical cleaning (using vinegar, baking soda, or specialized cleaning tablets to dissolve calcium deposits), and Thermal disinfection (running a hot water cycle to kill bacteria lurking in the rubber gasket crevices).
To keep this "workhorse" durable and prevent it from becoming a silent breeding ground for bacteria, maintaining a cleaning rhythm is essential. Depending on the intensity of use, you can refer to the schedule below so as not to miss the "golden moment" for maintenance:
| Cleaning Level | Frequency | Main Objective |
|---|---|---|
| Quick Clean (Wiping rubber gaskets, detergent drawer) | Weekly | Prevent black mold and odors from starting. |
| Deep Clean (Running descaling cycle, tub wash) | Every 1 - 2 months | Remove caked-on soap scum and deep-seated bacteria. |
| Technical Maintenance (Checking drain hose, pump filter) | Every 6 months | Ensure proper drainage and avoid clogging. |
"Cleaning your washing machine periodically is not just about protecting an electronic device; it is about protecting the barrier that shields the skin of your loved ones."
Finally, a small but extremely important tip: always leave the washing machine door slightly ajar after each use. This is like opening a window for a room to breathe, helping moisture escape and eliminating the living environment for stubborn molds. Wishing you and your family fresh-smelling clothes and a standard clean living space!